[안드로이드] Intent / 데이터 주고 받기, 액티비티 전환
Intent는 안드로이드의 4가지 컴포넌트가 서로 데이터를 주고 받을 때 사용하는 메시지 객체다.
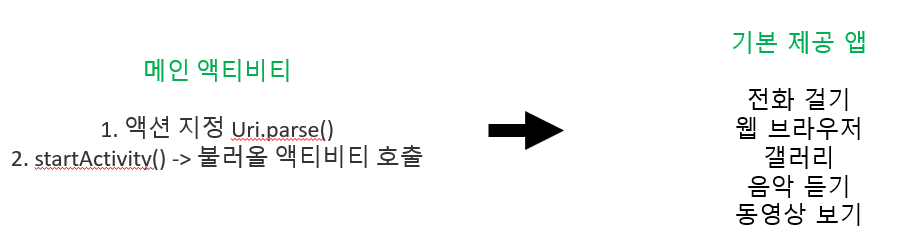
Intent에는 명시적 인텐트와 암시적 인텐트가 있다.
먼저, 명시적 인텐트는 클래스 객체나 컴포넌트의 이름을 지정하여 호출 대상을 명확히 알 때 사용하는 방법이고, 암시적 인텐트는 액션과 데이터를 지정하여 안드로이드에서 제공해주는 기존 응용 프로그램을 실행하는 것이다.
안드로이드의 4가지 컴포넌트
| 액티비티(Activity) | 화면을 구성하는 가장 기본적인 컴포넌트 |
| 서비스(Service) | 액티비티와 상관없이 백그라운드에서 동작하는 컴포넌트 (서비스 생성 -> 서비스 시작 -> 서비스 종료) |
| 브로드캐스트 리시버(Broadcast Receiver) | 메시지 도착, 배터리 방전 등 방송 신호를 받아서 처리하는 컴포넌트 |
| 내용 제공자(Content Provider) | 응용 프로그램 사이에 데이터를 공유하기 위한 컴포넌트 Ex) 통화 목록 가져오기 |
인텐트 객체에 데이터는 key, value 값으로 구성 ( putExtra(key, value) )
key를 통해 데이터를 가져올 수 있다.
startActivity() or startActivityForResult() 는 새 액티비티 호출
startService() or bindService() 는 서비스 호출 (서비스 액티비티를 호출하는 것으로 개념은 비슷하다, 화면에 나오냐 마냐... 그 차이로 알고있다..)
명시적 인텐트

코드
activity_main.xml
<?xml version="1.0" encoding="utf-8"?>
<LinearLayout xmlns:android="http://schemas.android.com/apk/res/android"
    xmlns:app="http://schemas.android.com/apk/res-auto"
    xmlns:tools="http://schemas.android.com/tools"
    android:layout_width="match_parent"
    android:layout_height="match_parent"
    tools:context=".MainActivity"
    android:gravity="center_horizontal|center_vertical"
    android:orientation="vertical">

    <EditText
        android:layout_width="match_parent"
        android:layout_height="wrap_content"
        android:hint="넘길 숫자(데이터)를 입력해주세요."
        android:id="@+id/edittext1"
        android:layout_margin="10dp"/>

    <Button
        android:layout_width="wrap_content"
        android:layout_height="wrap_content"
        android:text="버튼"
        android:layout_margin="50dp"
        android:id="@+id/button1"/>


</LinearLayout>
MainAcitivity.java
public class MainActivity extends AppCompatActivity {

    EditText et1;
    Button b1;

    @Override
    protected void onCreate(Bundle savedInstanceState) {
        super.onCreate(savedInstanceState);
        setContentView(R.layout.activity_main);

        setTitle("첫번째 액티비티");

        et1 = findViewById(R.id.edittext1);
        b1 = findViewById(R.id.button1);

        b1.setOnClickListener(new View.OnClickListener() {
            @Override
            public void onClick(View v) {
                //인텐트 객체 생성
                Intent intent = new Intent(현재 액티비티명.this, 두번째 액티비티명.class);
                //데이터를 보낼 때 number1 이라는 이름으로 보냄
                intent.putExtra("number1",Integer.parseInt(et1.getText().toString()));

                startActivity(intent); //second 액티비티 호출
            }
        });
    }
}
activity_second.xml
<?xml version="1.0" encoding="utf-8"?>
<LinearLayout xmlns:android="http://schemas.android.com/apk/res/android"
    xmlns:app="http://schemas.android.com/apk/res-auto"
    xmlns:tools="http://schemas.android.com/tools"
    android:layout_width="match_parent"
    android:layout_height="match_parent"
    android:orientation="vertical"
    tools:context=".second"
    android:gravity="center">

    <TextView
        android:layout_width="wrap_content"
        android:layout_height="wrap_content"
        android:id="@+id/textview1"
        android:layout_margin="10dp"
        android:textSize="20dp"/>

    <EditText
        android:layout_width="match_parent"
        android:layout_height="wrap_content"
        android:id="@+id/edittext1"
        android:hint="받은 값에 더할 숫자를 넣어주세요."
        android:layout_margin="10dp"/>

    <Button
        android:layout_width="wrap_content"
        android:layout_height="wrap_content"
        android:text="버튼"
        android:id="@+id/button1"
        android:layout_margin="10dp"/>

</LinearLayout>
second.java
public class second extends AppCompatActivity {

    TextView tv1;
    EditText et1;
    Button b1;

    @Override
    protected void onCreate(Bundle savedInstanceState) {
        super.onCreate(savedInstanceState);
        setContentView(R.layout.activity_second);

        setTitle("두번째 액티비티");

        tv1 = findViewById(R.id.textview1);
        et1 = findViewById(R.id.edittext1);
        b1 = findViewById(R.id.button1);

        Intent getdata = getIntent();

        //넘겨받은 값이 int형 정수이므로 getIntExtra 사용
        //number1 이라는 이름으로 값을 받음, 그렇지 않을 시 0
        int number1 = getdata.getIntExtra("number1",0);

        tv1.setText(String.valueOf(number1));

        b1.setOnClickListener(new View.OnClickListener() {
            @Override
            public void onClick(View v) {
                finish(); //현재 액티비티 종료
            }
        });
    }
}
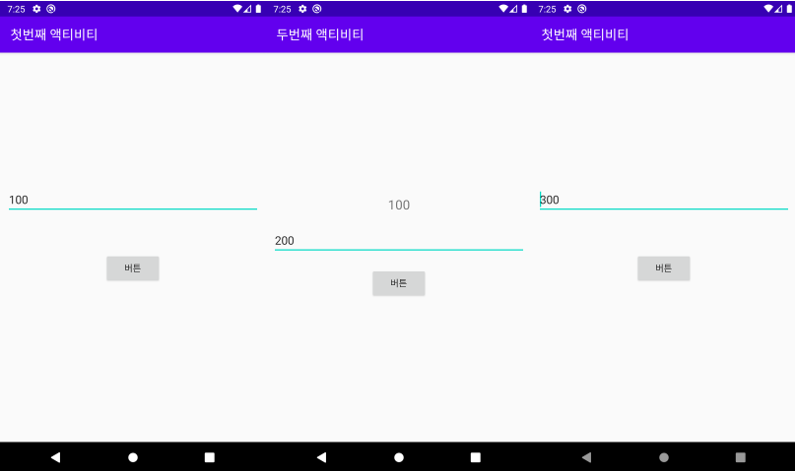
결과
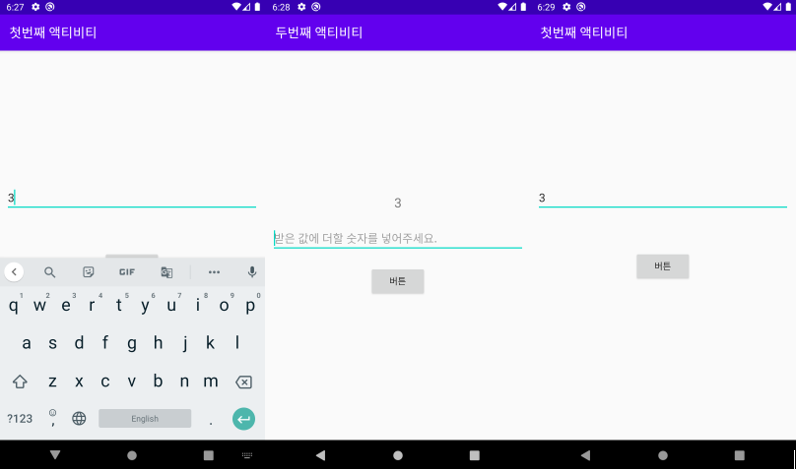
명시적 인텐트 - 양방향 액티비티
양방향 액티비티는 첫번째 액티비티에서 데이터를 보낸 후 두번째 액티비티에서 다시 첫번째 액티비티로 데이터를 넘겨주는 것이다. 데이터를 주고받아서 양방향 액티비티라 부르는 것 같다.
첫번째 액티비티에서 두번째 액티비티를 호출할 때 기존에 사용하였던 startActivity()가 아닌 startActivityForResult()를 사용한다. 두번째 액티비티에서는 setResult()를 사용하여 다시 첫번째 액티비티로 데이터를 보내주고, 첫번재 액티비티에서는 onActivityResult() 메소드를 오버라이딩하여 데이터를 돌려받는다.
이 개념에서는 파라미터 중 하나로 응답 코드(RESULT_OK)(상수)가 존재하는데, 이것으로 이 데이터가 어떤 액티비티에서 온 데이터인지 구별해서 받을 수 있다.
코드
xml은 위 코드와 동일
MainActivity.java
public class MainActivity extends AppCompatActivity {

    EditText et1;
    Button b1;

    @Override
    protected void onCreate(Bundle savedInstanceState) {
        super.onCreate(savedInstanceState);
        setContentView(R.layout.activity_main);

        setTitle("첫번째 액티비티");

        et1 = findViewById(R.id.edittext1);
        b1 = findViewById(R.id.button1);

        b1.setOnClickListener(new View.OnClickListener() {
            @Override
            public void onClick(View v) {
                //인텐트 객체 생성
                Intent intent = new Intent(현재 액티비티명.this, 두번째 액티비티명.class);
                //데이터를 보낼 때 number1 이라는 이름으로 보냄
                intent.putExtra("number1",Integer.parseInt(et1.getText().toString()));
                //startActivity()가 아닌 것에 주의!
                startActivityForResult(intent, 0);
            }
        });
    }

    @Override
    protected void onActivityResult(int requestCode, int resultCode, Intent data) {
        super.onActivityResult(requestCode, resultCode, data);
        //resultCode가 RESULT_OK면 if문을 실행한다.
        if (resultCode == RESULT_OK) {
            int sum = data.getIntExtra("sum", 0);
            et1.setText(String.valueOf(sum));
        }
    }
}
second.java
public class second extends AppCompatActivity {

    TextView tv1;
    EditText et1;
    Button b1;

    @Override
    protected void onCreate(Bundle savedInstanceState) {
        super.onCreate(savedInstanceState);
        setContentView(R.layout.activity_second);

        setTitle("두번째 액티비티");

        tv1 = findViewById(R.id.textview1);
        et1 = findViewById(R.id.edittext1);
        b1 = findViewById(R.id.button1);

        Intent getdata = getIntent();

        //넘겨받은 값이 int형 정수이므로 getIntExtra 사용
        //number1 이라는 이름으로 값을 받음, 그렇지 않을 시 0
        final int number1 = getdata.getIntExtra("number1",0);

        tv1.setText(String.valueOf(number1));

        b1.setOnClickListener(new View.OnClickListener() {
            @Override
            public void onClick(View v) {
                //인텐트 객체 생성
                Intent intent = new Intent(두번째 액티비티명.this, 메인 액티비티명.class);
                //sum 이라는 이름으로 받은 숫자와 새로 입력한 숫자를 더하여 넣음
                intent.putExtra("sum", Integer.parseInt(et1.getText().toString()) + number1);
                //응답코드를 구별하기 위해서 상수 사용
                setResult(RESULT_OK, intent);

                finish(); //현재 액티비티 종료
            }
        });
    }
}
결과
암시적 인텐트
인텐트의 기본 구성 요소는 액션(Action)과 데이터(Data)
코드
activity_main.xml
<?xml version="1.0" encoding="utf-8"?>
<LinearLayout xmlns:android="http://schemas.android.com/apk/res/android"
    xmlns:app="http://schemas.android.com/apk/res-auto"
    xmlns:tools="http://schemas.android.com/tools"
    android:layout_width="match_parent"
    android:layout_height="match_parent"
    tools:context=".MainActivity"
    android:orientation="vertical"
    android:id="@+id/pictureLayout">

    <Button
        android:layout_width="match_parent"
        android:layout_height="wrap_content"
        android:id="@+id/btnDial"
        android:text="전화 걸기"/>

    <Button
        android:layout_width="match_parent"
        android:layout_height="wrap_content"
        android:id="@+id/btnWeb"
        android:text="홈페이지 열기"/>

    <Button
        android:layout_width="match_parent"
        android:layout_height="wrap_content"
        android:id="@+id/btnGoogle"
        android:text="구글 맵 열기"/>

    <Button
        android:layout_width="match_parent"
        android:layout_height="wrap_content"
        android:id="@+id/btnSearch"
        android:text="구글 검색하기"/>

    <Button
        android:layout_width="match_parent"
        android:layout_height="wrap_content"
        android:id="@+id/btnSms"
        android:text="문자 보내기"/>

    <Button
        android:layout_width="match_parent"
        android:layout_height="wrap_content"
        android:id="@+id/btnPhoto"
        android:text="사진 찍기"/>


</LinearLayout>
MainActivity.java
public class MainActivity extends AppCompatActivity {

    @Override
    protected void onCreate(Bundle savedInstanceState) {
        super.onCreate(savedInstanceState);
        setContentView(R.layout.activity_main);

        setTitle("암시적 인텐트");

        Button btnDial = findViewById(R.id.btnDial);
        Button btnWeb = findViewById(R.id.btnWeb);
        Button btnGoogle = findViewById(R.id.btnGoogle);
        Button btnSearch = findViewById(R.id.btnSearch);
        Button btnSms = findViewById(R.id.btnSms);
        Button btnPhoto = findViewById(R.id.btnPhoto);

        //전화걸기
        btnDial.setOnClickListener(new View.OnClickListener() {
            @Override
            public void onClick(View v) {
                Intent intent = new Intent(Intent.ACTION_DIAL, Uri.parse("tel:01012345678"));
                startActivity(intent);
            }
        });

        //홈페이지 열기
        btnWeb.setOnClickListener(new View.OnClickListener() {
            @Override
            public void onClick(View v) {
                Uri uri = Uri.parse("http://www.hanbit.co.kr");
                Intent intent = new Intent(Intent.ACTION_VIEW, uri);
                startActivity(intent);
            }
        });
        //구글 맵 열기
        btnGoogle.setOnClickListener(new View.OnClickListener() {
            @Override
            public void onClick(View v) {
                Uri uri = Uri.parse("http://maps.google.com/maps?q="+37.559133 +","+ 126.927824);
                Intent intent = new Intent(Intent.ACTION_VIEW, uri);
                startActivity(intent);
            }
        });
        //구글 검색
        btnSearch.setOnClickListener(new View.OnClickListener() {
            @Override
            public void onClick(View v) {
                Intent intent = new Intent(Intent.ACTION_WEB_SEARCH);
                intent.putExtra(SearchManager.QUERY, "안드로이드");
                startActivity(intent);
            }
        });
        //문자 보내기
        btnSms.setOnClickListener(new View.OnClickListener() {
            @Override
            public void onClick(View v) {
                Intent intent = new Intent(Intent.ACTION_SENDTO);
                intent.putExtra("sms_body", "안녕하세요?");
                intent.setData(Uri.parse("smsto:"+Uri.encode("010-1234-5678")));
                startActivity(intent);
            }
        });
        //사진 찍기
        btnPhoto.setOnClickListener(new View.OnClickListener() {
            @Override
            public void onClick(View v) {
                Intent intent = new Intent(MediaStore.ACTION_IMAGE_CAPTURE);
                startActivity(intent);
            }
        });
    }
}
결과

부족한 점, 피드백 환영합니다.
감사합니다.